Thursday, 30 March 2017
This blog is now closed
I have now completed my AS Media coursework and with that comes the closing of this blog. No further posts will be made. Please feel free to look around my blog and I hope you enjoy reading it!
Wednesday, 29 March 2017
Evaluation Post 1: In what way does your media product use, develop or challenge forms and conventions of real media products?
Our Film Plot:
Our film opening uses, develops and challenges forms and conventions of real media products through the genre, narrative, character roles and editing techniques. We used various real life films as reference such as 'The Blair Witch Project', 'Quarantine' and 'Contagion'.
Our film entails a story of a group of teenagers investigating the mysterious disappearances occurring in a local forest in a North London suburb, and how as the film progresses the group gets smaller and smaller until one girl survives thus also enforcing the 'final girl' theme.
Form:
Our opening sequence definitely followed the typical format that similar opening sequences conformed to, and this was done well as having talked to peers and members of our target audience they felt our characters were well portrayed and they all wanted to see more.
Our two main inspirations for titles were The Shining and Se7en - both films of a similar genre. Sinister influenced our title order, The Shining gave us the idea of super-imposing the titles over the shot in order to build up a suspenseful atmosphere and Se7en inspired our contrast of white titles against a dark shot.
 |
| Comparison of title order |
 |
| Comparison of super-imposed titles |
 |
| Comparison of the title contrast |
We included dialogue but only from the middle of our sequence onwards, this was so we could effectively build up tension and a sense of mystery from the very start. We never had more than one character in a single shot so shot/reverse/shot was not a viable option, however we did this to show the danger in each shot and this was done to good effect. The main dialogue was our news reporter introducing the crime in the forest, an idea that was inspired from a similar style news broadcast in Quarantine and similar setting in The Blair Witch.

Genre Conventions for Horror/Thriller Films:
The following is a prezi which not only details the genre conventions for horror/thriller films but also shows where and how we followed and challenged these conventions.
Narrative Structure:

Style:
We styled our film opening with genre conventions in mind as we wanted the final product to be as connoting of our intended genre as possible.
1) Grading
 |
| Grading in Disturbances (our film opening) |
 |
| Grading in Se7en ( reference film) |
Our grading is similar to that of Se7en. It is very low-lit with high contrast and low saturation to connote a dark, mysterious atmosphere as is conventional of our genre.
2) Sound
We took inspiration for our soundtrack from The Shining which uses a similar, spooky, classical soundtrack, and edited it so that it would build up in volume and tempo at points of action or at key moments in the film opening such as when the camera falls and breaks or when the antagonist says "it's done".
 |
| The Shining inspired our film soundtrack |
We took inspiration for our dialogue in the news report from Quarantine as it also featured a news report and was of a similar genre.
 |
| The Quarantine inspired the dialogue for our news reporter |
In conclusion, our film opening follows many conventions of the genre and challenges very few. This is good as the audience will easily identify it as a horror/thriller and therefore engage much more effectively with our film. With all this in mind it is safe to conclude our film opening is very similar to real media film products.
Evaluation Post 2: How does your media product represent particular social groups?
The film opening itself has a strong focus on the representation of young men within the age group of 16-24. This is because the film opening is largely focused on our antagonist who is of this gender and age group. We chose to represent this particular social group as powerful and in control as not only is it convention, we also felt it would empower men and therefore increase male appeal - particularly amongst the 16-24 age group. We created these representations through costume, acting and camera.
A large reason why we chose this social group to primarily represent in our film opening is due to convention. From my research it was clear that males are very strongly represented in the film industry, and therefore it would be conventional to have a male lead thus allowing audiences to identify with and engage with our film more easily.
There were 3 main ways by which we represented our character as powerful and in control:
1) Costume:
 As you can see in this picture our antagonist is simply wearing a hoodie and tracksuit bottoms. First of all, this makes him instantly identifiable to the audience as being a part of the 16-24 age bracket as this type of clothing is very common amongst this age group. In this way our character becomes more relatable which increases appeal and better engages the audience.
We made sure that our antagonist took his hood off. This makes him seem more comfortable within this situation, and that way he appears more confident of his own safety as he's not trying to hide himself. This shows him to be in control of the situation as clearly there is no immediate risk to him.
Building on the previous point, the fact that he's wearing tracksuit bottoms and a hoodie shows how comfortable he is, as these clothes are associated with lazing around, and therefore once again shows him to be in control.
2) Acting:
Throughout our film opening our antagonist doesn't seem to walk with much urgency, rather he walks at quite a normal, comfortable pace. This shows there is no danger to him currently as he is in control of the situation.
Additionally, when the antagonist is sitting, he sits in a comfortable and laid-back manner. Normally, in such a tense situation you would expect him to be on the edge of his seat, and so this shows his power and how he's in control.
3) Camera:
Throughout the film opening the camera seemingly follows our antagonist. Through the continuity editing we have also placed the audience in the action in the beginning. Therefore, it creates the illusion that the audience are following the antagonist through the house, this means the antagonist sees and knows everything before the audience thus putting him in a position of power.
Sherlock:
Both Sherlock and our film opening share similar antagonists. Moriarty in Sherlock is often seen to be in power and in control of the situation.
As you can see in this shot, despite being held at gunpoint by Sherlock, Moriarty stays calm instead of panicking as you would expect. In this situation, you would expect the power dynamic to be in Sherlock's favour, yet from Moriarty's mood and expression it almost seems as if he still has the power and is in control. This is the behaviour of a well constructed antagonist and so we were inspired by it when making our character choices.
Additionally, we used the news team as a means of representing the 20-30 age group as working, young professionals. This is obvious as they play arguably the biggest roles in a news team which is news anchor and news reporter and so this would require a very high level of professionalism. We also had the roles played by both gender and used two people of different ethnicities as we felt this accurately reflected the social make-up of London and so it was the sort of diversity the audience would have expected.


As you can see our characters are clearly portrayed as young professionals and display ethnic diversity.

A large reason why we chose this social group to primarily represent in our film opening is due to convention. From my research it was clear that males are very strongly represented in the film industry, and therefore it would be conventional to have a male lead thus allowing audiences to identify with and engage with our film more easily.
 |
| The strong male representation in the film industry |
1) Costume:

We made sure that our antagonist took his hood off. This makes him seem more comfortable within this situation, and that way he appears more confident of his own safety as he's not trying to hide himself. This shows him to be in control of the situation as clearly there is no immediate risk to him.
Building on the previous point, the fact that he's wearing tracksuit bottoms and a hoodie shows how comfortable he is, as these clothes are associated with lazing around, and therefore once again shows him to be in control.
2) Acting:
Throughout our film opening our antagonist doesn't seem to walk with much urgency, rather he walks at quite a normal, comfortable pace. This shows there is no danger to him currently as he is in control of the situation.

Additionally, when the antagonist is sitting, he sits in a comfortable and laid-back manner. Normally, in such a tense situation you would expect him to be on the edge of his seat, and so this shows his power and how he's in control.
3) Camera:
Throughout the film opening the camera seemingly follows our antagonist. Through the continuity editing we have also placed the audience in the action in the beginning. Therefore, it creates the illusion that the audience are following the antagonist through the house, this means the antagonist sees and knows everything before the audience thus putting him in a position of power.
Sherlock:
Both Sherlock and our film opening share similar antagonists. Moriarty in Sherlock is often seen to be in power and in control of the situation.
 |
| Moriarty from Sherlock |
Additionally, we used the news team as a means of representing the 20-30 age group as working, young professionals. This is obvious as they play arguably the biggest roles in a news team which is news anchor and news reporter and so this would require a very high level of professionalism. We also had the roles played by both gender and used two people of different ethnicities as we felt this accurately reflected the social make-up of London and so it was the sort of diversity the audience would have expected.

As you can see our characters are clearly portrayed as young professionals and display ethnic diversity.
This news reporter from Quarantine was a big influence for having a female news reporter.
Evaluation Post 3: What kind of media institution might distribute your media product and why?
Our production company was a London based company called Hammer Productions, an institution known for producing dark films - particularly horror/thrillers similar to our film.


Our distribution company was a global, horizontally and vertically integrated institution - Warner Bros. They are known for thrillers e.g. Inception, The Dark Knight, The Shining and therefore our film would be ideal for them to buy the rights to and distribute as it is the same genre and therefore targets an audience which is already targeted by Warner Bros. A big advantage of working with such a big institution is that they have global reach and appeal and therefore will allow our film to be seen by as large an audience as possible thus maximising commercial success.
Having looked at similar indie films and other films distributed by Warner Bros we have decided to incorporate both traditional methods and social media into our marketing campaign to effectively reach and appeal to our target audience. We also took inspiration from other films distributed by Warner Bros when designing our release plan.
 |
| This is an extract from the official Warner Bros website showing their global status and integrated nature. |
Evaluation Post 4: Who would be the audience for your media product?
There are a number of audiences for our film. The primary audience is all horror or thriller fans - regardless of gender. Below is an emaze detailing our various audiences:

Evaluation Post 5: How did you attract/address your audience?
We addressed and attracted our audience by considering the uses and gratifications theory and meeting the audience's needs, and also through conforming to genre conventions with appropriate themes and characters. Please find below a mind map explaining this in more detail.
Please click present mode in the top right of the mind map for easier navigation.
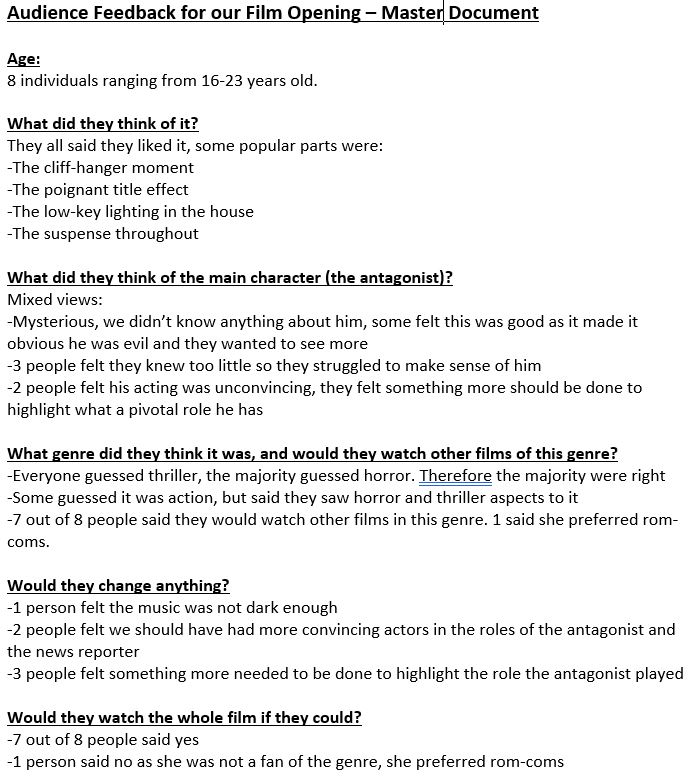
Audience Feedback
In total I interviewed 8 people - 4 boys, 4 girls - in order to get feedback on our film opening and judge how successful we were off of that. Below are two interviews that I recorded so as to show you the interview process.
The individuals in these videos were all 16 or 17, and therefore represented one end of our target audience age group of 16-24 year olds. On top of this I also interviewed 2 males and 2 females who were all 21-23 years old so as to collect feedback from the other end of the spectrum. As you can see below, I have collated all the feedback we received into one document.

In conclusion, it seems we were very successful as the majority of the target audience sample said they would watch the entire film, therefore we have clearly met their needs. People particularly enjoyed the suspenseful atmosphere created by the music, the cliff-hanger and the low-key lighting and for the most part were able to directly link this to the horror/thriller genre. This is likely to be because we conformed to genre conventions so the audience could easily identify the genre, thus reinforcing the importance of us following genre conventions and also gratifying the audience's needs for escapism and entertainment as they can easily immerse themselves. Additionally, the consensus seemed to be that people had a lot of questions about what they watched that they wanted to ask, this gratifies their need for social interaction as they will likely discuss this with their friends.
There were some issues that some people highlighted such as unconvincing acting, however it was always a minority and it never seemed to drastically affect their enjoyment. Despite this, I do agree that particular actors were unconvincing and perhaps in the future we would be more thorough and selective with our casting choices. Thankfully, it seemed that those in our target audience sample who raised this point still felt that their need for entertainment had been gratified and therefore we were clearly successful in addressing and attracting the audience.
From a personal point of view, although no one raised this I felt in hindsight that 'Jean Smith' was not an appropriate or classic name for a young, British Muslim. This could potentially limit the appeal to the Muslim demographic as they may find it harder to identify with this character and so 'Jean Smith' may not gratify their needs for identifying with characters. In hindsight, I would do more research into potential character names and choose one more fitting of a young, British Muslim woman.
Please click present mode in the top right of the mind map for easier navigation.
Audience Feedback
In total I interviewed 8 people - 4 boys, 4 girls - in order to get feedback on our film opening and judge how successful we were off of that. Below are two interviews that I recorded so as to show you the interview process.
The individuals in these videos were all 16 or 17, and therefore represented one end of our target audience age group of 16-24 year olds. On top of this I also interviewed 2 males and 2 females who were all 21-23 years old so as to collect feedback from the other end of the spectrum. As you can see below, I have collated all the feedback we received into one document.
In conclusion, it seems we were very successful as the majority of the target audience sample said they would watch the entire film, therefore we have clearly met their needs. People particularly enjoyed the suspenseful atmosphere created by the music, the cliff-hanger and the low-key lighting and for the most part were able to directly link this to the horror/thriller genre. This is likely to be because we conformed to genre conventions so the audience could easily identify the genre, thus reinforcing the importance of us following genre conventions and also gratifying the audience's needs for escapism and entertainment as they can easily immerse themselves. Additionally, the consensus seemed to be that people had a lot of questions about what they watched that they wanted to ask, this gratifies their need for social interaction as they will likely discuss this with their friends.
There were some issues that some people highlighted such as unconvincing acting, however it was always a minority and it never seemed to drastically affect their enjoyment. Despite this, I do agree that particular actors were unconvincing and perhaps in the future we would be more thorough and selective with our casting choices. Thankfully, it seemed that those in our target audience sample who raised this point still felt that their need for entertainment had been gratified and therefore we were clearly successful in addressing and attracting the audience.
From a personal point of view, although no one raised this I felt in hindsight that 'Jean Smith' was not an appropriate or classic name for a young, British Muslim. This could potentially limit the appeal to the Muslim demographic as they may find it harder to identify with this character and so 'Jean Smith' may not gratify their needs for identifying with characters. In hindsight, I would do more research into potential character names and choose one more fitting of a young, British Muslim woman.
Evaluation Post 6: What have you learnt about technologies from the process of constructing this product?
Throughout this project, I have not only developed my already existing knowledge of technologies I've previously used but I've also learnt about new technologies and through practice become confident with these too. In order to explore my learning curve with regards to technology, I have created a prezi which can be seen below:
Evaluation Post 7: Looking back at your preliminary task, what do you feel you have learnt in the progression from it to the full product?
My knowledge and skills from both shooting and editing standpoints have improved massively since the preliminary task and this is shown by the improved quality of my work in the full product when compared to the prelim.
Comparison of the Briefs:
Prelim Brief: Create a short continuity sequence in which a character opens a door, crosses a room and sits down opposite another character where they then exchange a couple lines of dialogue. Include match on action, shot/reverse/shot and the 180° rule.
Main Brief: Produce a 2 minute opening sequence for a fiction film with a clear sense of who the target audience is. Include titles throughout, a copyright-free soundtrack and sound effects, some form of continuity and display clear genre conventions through character, theme, story, action, mise-en-scene, dialogue, sound, camera, editing, style etc.
As you can see the main brief was much more intensive and difficult than the prelim brief, however I still felt that I performed better in the main task as the prelim prepared me quite well. From the prelim I learnt several lessons with regards to how I should approach the main task and this helped me improve the quality of my work. For example, from a shooting standpoint I learnt to always film the whole movement to avoid continuity errors, and also to film a master shot as a back up option in case there is a continuity error. From an editing standpoint I learnt to always rename your shots first as it makes the rest of the editing process much faster and much more efficient.
Pre-Production:
The table below shows the differences in the planning process.

For the main brief we went into much more detail with the planning and did much more intensive research as from the prelim we learnt that a lack of planning leads to a lot of wasted time later on as your are unsure of what to do. Additionally, the prelim planning process gave us experience in the planning stage so we knew where to improve when it came to the main task.
Production:
The basic principles were the same across both tasks, for example we followed the same continuity rules. However, the production for each was very different as we were able to experiment a lot more, for example we experimented with shaky handheld shots in the main task whereas we weren't able to in the prelim.
Similarity Example:
This displays the continuity rule of match on action in the prelim
This displays the continuity rule of match on action in the main task
The match on action was much smoother in the main task than in the prelim as I felt in the prelim there was a slight jump cut which we were able to avoid in the main task.
Difference Example:
Taken from the main task
In the main task we had more freedom and time to experiment with different types of shots that we were unable to try out in the prelim. Above is an example of a shaky handheld shot which worked very well in our main task but we were unable to experiment with in the prelim. This was a very tricky shot, however because we had much more time we were able to shoot a lot more takes until we had one we were happy with.
Post Production:
We used the same software for editing in both projects but in the main task we were able to take advantage of more editing tools in Adobe Premiere than in the prelim. For example, I learnt how to use a key-frame zoom, how to implement special effects and how to grade our shots.
A keyframe zoom from the main task
An example of where I implemented special effects
In terms of what the prelim taught us for editing there were three key learning points:
1) Always name your shots as it saves time later on when you're looking for the shot you wish to work with.
2) Before doing any advanced editing e.g. special effects/grading, have all your shots roughly cut down and in the timeline.
3) When placing shots in the timeline place them on alternate tracks so that everything is easier to move, edit and you avoid messing with the wrong shot.
In conclusion, the progression from the preliminary task to the full product has seen a huge increase in my technical ability with both the shooting equipment and editing software. Compared to when we did the prelim task I feel much more confident in my ability to produce a quality media product and am proud of not only myself, but also my group as we have all improved together.
Monday, 20 March 2017
Construction Post 30: Looking back - reflections on our final outcome
My group and I have recorded a podcast in which we talk about our final media product and what we think of the final outcome. I have uploaded it to SoundCloud and you can access it below:
Sunday, 19 March 2017
Construction Post 29: My Technical Learning Curve
This project has taught me so much from multiple standpoints, from a shooting standpoint, an editing standpoint and an organisational standpoint. I have certainly learnt a lot in this project and have become more technically able in media studies.
Whilst I have shot before, I have never shot a handheld shot and in this way the production phase was a huge learning experience for me. It was challenging as you don't have a spirit level to tell you if the shot is canted or not like you do when using a tripod. Therefore, you have to make a conscious effort to keep the camera straight and it certainly took me multiple attempts before I achieved this.
With regards to shooting, I certainly learnt a lot more technical factors to be aware of when shooting. For example, with every shot we had to consider continuity and make sure we weren't going to break any rules and cause a jump cut for example. This required me to engage even more with the production process and certainly taught me a lot with regards to production in the media industry.
I already had previous experience with our editing software - Adobe Premiere Pro - however I learnt much more this time round and felt like I certainly made much better use of the tools available to me in this programme when compared to previous experiences. For example, I learnt how to zoom in on specific parts of shots in editing using key frames whereas previously I would have simply zoomed in when shooting which would have been much more unprofessional. I also learnt how to effectively use and edit visual FX and I enjoyed this learning process a lot. As a result, I now feel much more confident when editing.
Above is an example of a key-frame zoom. As you can imagine this looked much more professional than it would have if we were to zoom in when shooting.
In terms of skills that aren't necessarily exclusive to media, this project has greatly improved my organisation. This is because in order to consistently work efficiently my organisation always had to be good. This is because there are so many factors that need organising for the project to run smoothly, for example I had to help organise actors, their timings, costumes and locations and frequently remind them. This requires high organisational skills and mine have certainly improved as a result.
Whilst I have shot before, I have never shot a handheld shot and in this way the production phase was a huge learning experience for me. It was challenging as you don't have a spirit level to tell you if the shot is canted or not like you do when using a tripod. Therefore, you have to make a conscious effort to keep the camera straight and it certainly took me multiple attempts before I achieved this.
Above is footage of me shooting a handheld shot. As you can see it was very important for me to stay as still and steady as possible
I already had previous experience with our editing software - Adobe Premiere Pro - however I learnt much more this time round and felt like I certainly made much better use of the tools available to me in this programme when compared to previous experiences. For example, I learnt how to zoom in on specific parts of shots in editing using key frames whereas previously I would have simply zoomed in when shooting which would have been much more unprofessional. I also learnt how to effectively use and edit visual FX and I enjoyed this learning process a lot. As a result, I now feel much more confident when editing.
Above is an example of a key-frame zoom. As you can imagine this looked much more professional than it would have if we were to zoom in when shooting.
In terms of skills that aren't necessarily exclusive to media, this project has greatly improved my organisation. This is because in order to consistently work efficiently my organisation always had to be good. This is because there are so many factors that need organising for the project to run smoothly, for example I had to help organise actors, their timings, costumes and locations and frequently remind them. This requires high organisational skills and mine have certainly improved as a result.
Construction Post 28: My Personal Contribution to Post-Production
In terms of the post-production process I took charge and did most of three aspects of the editing:
1) Visual FX:
I was in charge of the visual FX as I have had the most experience with that having briefly used them in GCSE Media. This was a time-consuming process in which I got to learn and use many different tools within Adobe Premiere such as wave warp or noise. The visual FX are largely concentrated in one scene in which t he camera falls and breaks and I was very happy with how it turned out, as were my group and teachers when I played it for them. With the help of our technician, I also located a glitch overlay effect online which I imported into Premiere and edited to create the illusion of the screen crackling.
2) Grading:
Once again, I had past experience with grading from GCSE Media and so I was already familiar with the process, hence why I was delegated the responsibility of grading. The process was technically very challenging at the start when you're trying to find the right look, however after the first few shots the process became much quicker as many shots required the same grading effects due to us shooting in similar lighting and sets throughout. In the end, having listened to my groups feedback and teacher feedback I think the grading turned out to be a success.
3) Reaction Shots:
I edited in the reaction shots, although as a group we all agreed on the placement and length of them within our film opening. These shots proved to be more difficult than I initially thought as I had to sound-bridge the audio from the previous shot whilst still maintaining continuity, however I still enjoyed the process. The reaction shots also involved me editing in a zoom using keyframes, this was something I had never done before, so I thoroughly enjoyed learning a new skill.
Much of the responsibility for sound and continuity editing fell on Laith and Aisha due to the way roles were delegated, however we each did fair amounts of work.
Construction Post 27: My Personal Contribution to Filming the Sequence
I served different roles in each of the different locations:
Location 1 & 2: Laith's House and Enfield Island Village Forest


Location 1 & 2: Laith's House and Enfield Island Village Forest
- Director: This meant that I helped organise actors and help them with things such as learning the script. It also meant that when shooting I would position the actor and give them pointers on how to deliver their lines or action. Part of my role as director was also ensuring the set looked how we wanted it to.
- Cameraman: As both other members in my group were acting in these two locations we agreed that I would stay on camera as it meant that not only would I be able to direct easily but it also ensured I was still doing a fair amount of work. Additionally, our outdoor shots were handheld shots and we realised that I had the most steady hands, therefore it made sense for me to shoot these.
Footage of me as cameraman
Location 3: School - Media Classroom
- Organizer: I was in charge of organising our actor for this scene, I discussed an ideal shooting time with and confirmed it. Then the night prior to the shoot I made sure to remind him of the shooting arrangements the next day. Additionally, I was in charge of organising a suitable costume for the actor and making sure it was ready for him on the day. I am happy to say I fulfilled both these duties well.
- Actor: I wasn't the main actor, however I was in the newsroom acting as a worker. This involved me wearing a smart costume and acting as if I was filing documents. My role here was important as it added to the realism of the scene, thus allowing the audience to engage easier.
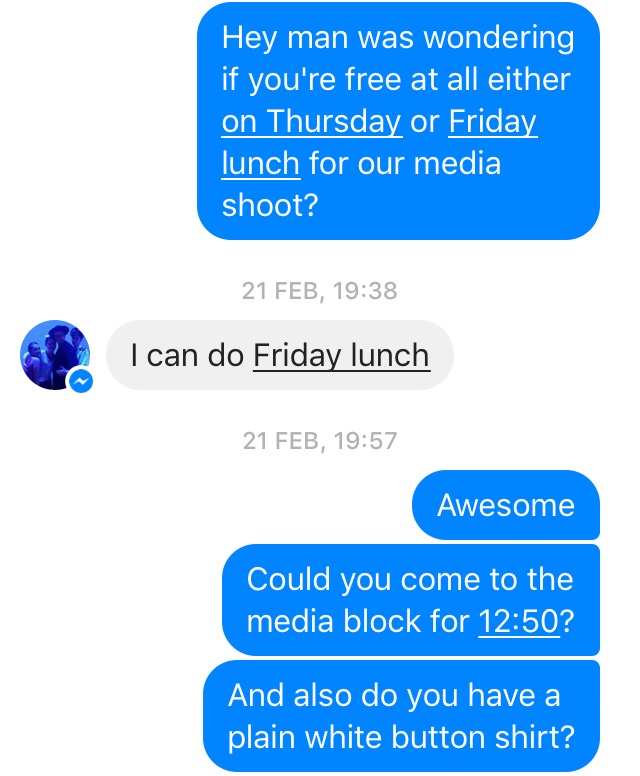

Screenshots of myself organising with my actor when and where we would have our shoot
Construction Post 26: Edit Week 2: Titles, Video FX, Grading
Following a successful edit week 1, we wanted to continue this by completing our film opening by the end of edit week 2. This involved us putting in and editing all the footage from the back up shoot, as well as grading each shot, and putting in titles and video FX when necessary. Similar to edit week 1, we had an edit schedule for edit week 2 to ensure everyone did a fair amount of work.

In terms of grading, we wanted to darken and increase the contrast of every shot, particularly the ones of the antagonist so as to subtly obscure his facial details and build an atmosphere of suspense and mystery. Our inspiration for this grading style was a film of a similar genre; The Dark Knight; as seen below:
I believe we achieved this effect with ours, although the orange look that we had in each shot interfered with this and perhaps held us back. In the future I would consider using a less orange room as all the walls in the room were orange which went against our intended dark, high contrast theme.
To achieve this effect in grading we used three tools:
1) Three-Way Colour Corrector
2) Levels
3) ProcAmp
In terms of titles, we created them on LiveType using the 'frigid' effect as well as also using the 'drop in' effect on the title 'Disturbances'. Our titles were white so as to create a strong contrast against the dark shot and effectively super impose themselves onto the screen. The inspiration for our titles came from a variety of similar genre films, for example Se7en inspired the idea or a white contrasting title colour and The Dark Knight inspired our title order.
Finally, we didn't use too many video FX in our film opening, we only used them when the camera fell and broke during the news report as that was the only appropriate time to do so. We used a glitch effect, wave warp and noise FX to create the effect of something inhuman interfering with the broadcast whilst also making the breaking of the camera look realistic. We took inspiration for this from Blair Witch and Quarantine.

In terms of grading, we wanted to darken and increase the contrast of every shot, particularly the ones of the antagonist so as to subtly obscure his facial details and build an atmosphere of suspense and mystery. Our inspiration for this grading style was a film of a similar genre; The Dark Knight; as seen below:
 |
| The grading in Disturbances (our film opening) |
 |
| The grading in The Dark Knight (inspiration) |
I believe we achieved this effect with ours, although the orange look that we had in each shot interfered with this and perhaps held us back. In the future I would consider using a less orange room as all the walls in the room were orange which went against our intended dark, high contrast theme.
To achieve this effect in grading we used three tools:
1) Three-Way Colour Corrector
2) Levels
3) ProcAmp
In terms of titles, we created them on LiveType using the 'frigid' effect as well as also using the 'drop in' effect on the title 'Disturbances'. Our titles were white so as to create a strong contrast against the dark shot and effectively super impose themselves onto the screen. The inspiration for our titles came from a variety of similar genre films, for example Se7en inspired the idea or a white contrasting title colour and The Dark Knight inspired our title order.
 |
| Title contrast in Disturbances (our film opening) |
 |
| Title contrast in Se7en (inspiration) |
Finally, we didn't use too many video FX in our film opening, we only used them when the camera fell and broke during the news report as that was the only appropriate time to do so. We used a glitch effect, wave warp and noise FX to create the effect of something inhuman interfering with the broadcast whilst also making the breaking of the camera look realistic. We took inspiration for this from Blair Witch and Quarantine.
Construction Post 25: Our Back Up Shoot
We scheduled our back up shoot for the 5th of March from 9am to 4pm, although as we were very time-efficient we did not use this whole time slot. Our efficiency can be put down to our preparedness beforehand as we had all the shots we needed to reshoot on a back up shootboard:

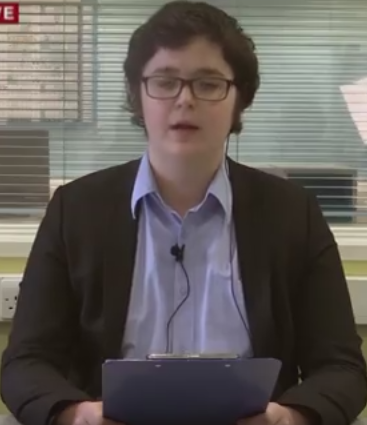
We shot the news reporter scene again and it was far more successful than it was in the main shoot. The costume looked far more professional and conventional of a news reporter and our actor stared straight into the camera as you would expect unlike in the main shoot.
We almost faced huge complications with this shot though due to the weather as it was forecasted to rain all day, however, having paid close attention to the weather using the BBC weather app we managed to shoot in a relatively dry period of the day so it didn't interfere much with the shot.
We also took advantage of the back up shoot to shoot some reaction shots of the antagonist reacting to the news report in order to solve our continuity errors. This turned out very well and allowed us to establish a clear sense of continuity throughout. One reaction shot can be seen below:
Overall, the back up shoot was a resounding success and was definitely worth the time as we more than achieved every goal we set.

We shot the news reporter scene again and it was far more successful than it was in the main shoot. The costume looked far more professional and conventional of a news reporter and our actor stared straight into the camera as you would expect unlike in the main shoot.
 |
| News Reporter After |
 |
| News Reporter Before |
We almost faced huge complications with this shot though due to the weather as it was forecasted to rain all day, however, having paid close attention to the weather using the BBC weather app we managed to shoot in a relatively dry period of the day so it didn't interfere much with the shot.
We also took advantage of the back up shoot to shoot some reaction shots of the antagonist reacting to the news report in order to solve our continuity errors. This turned out very well and allowed us to establish a clear sense of continuity throughout. One reaction shot can be seen below:
Overall, the back up shoot was a resounding success and was definitely worth the time as we more than achieved every goal we set.
Construction Post 24: Edit Week 1: The Basic Edit
As a group our target for the end of edit week 1 was to have gotten all our shots into the editing timeline and edited for continuity with the soundtrack and sound effects behind it. The reason for this is because this way we could see if there were any poor quality shots or if we weren't meeting the two minute demand of the brief and thus decide if we needed a back up shoot or not. This proved to be a very sensible approach as we realised we needed a back up shoot in this week which gave us plenty of time to organise and prepare for it. We also agreed an edit schedule at the beginning of the week to ensure everyone did a fair amount of work, this can be seen below:

We flagged up two main issues that required us to do a back up shoot:
1) In the news reporter scene, our actor does not look directly at the camera but instead looks to the side as she is in fact reading off of a script. This was very obvious when we were editing and having talked to friends, our technician and teachers we decided that it was not good enough and we would definitely require a back up shoot.
As you can see our news reporter clearly looks to the side of the camera
2) We had continuity errors throughout as it was not obvious to the audience that the antagonist was watching the news report on his laptop. This therefore ruined the atmosphere and immersion of our film opening and so we decided that we would have to shoot reaction shots so as to really enforce that the antagonist was watching the news report.
Even after highlighting these issues, we as a group felt very good about what we had and very confident going forward as we were being very efficient with time and already sticking to the brief very closely.
Construction Post 23: Our Post-Production Kit
Our post-production consisted of two factors:
Editing Hardware:
1) A computer with dual moniters
2) Headphones
3) A MacBook
These three pieces of hardware combined formed what we referred to as our edit suite.
 |
| Our Edit Suite |
Editing Software:
1) Adobe Premiere Pro
2) LiveType
All editing was carried out on a PC on Adobe Premiere Pro with the exception of titles which were done exclusively on the MacBook using a programme called LiveType.
 |
| LiveType on the MacBook |
Construction Post 22: Our Main Shoot Session
Following our test shoot we had made some revisions to the shootboard as we felt the need to add in two master shots for the sake of continuity and reaction shots.

Issues:
Unfortunately, due to unforeseen circumstances our main actor for the main shoot (the news reporter) didn't show up and only told us the day of the shoot that she couldn't make it. As a result, Aisha - another member of our group - had to step up and be our actor. However, due to the short notice Aisha was unable to memorise the script and as a result you can quite clearly see in the shot that she is reading off of a script to the side of the camera. This created a very unprofessional atmosphere and took away from the intended realism of a news report. This can be seen below:

Another issue is that when our antagonist opens up the laptop we experience a huge lighting error as the camera solely focused on the light from the laptop thus darkening the rest of the room to the point at which all details are obscured. We experimented with lighting in the main shoot to try and resolve this but had no success, then following a discussion with out technician and teacher we decided we would have to try and resolve the problem in editing.
What went well:
The test shoot highlighted multiple issues to us that we went on to resolve in the main shoot. For example, in the main shoot our outdoor setting does not look realistic as a forest as there is not enough trees or shrubbery, and you can also hear children playing in the nearby park. We resolved this in the main shoot by venturing deeper into the forest and in the end it created a much more realistic setting.
The news anchor scene in the newsroom was also very unrealistic due to our actors costume and a lack of activity in the newsroom behind our actor. To resolve this we provided the actor with our own costume, one that was more fitting of a news anchor and this proved to be a huge success. Furthermore, for the main shoot I went into the newsroom and worked on organising documents from the printer so as to effectively connote that it is a newsroom.
 |
| In the right of the shot you can see myself organising documents from the printer |
Construction Post 21: Our Production Kit
Before we took out our production kit, our media technician gave us in-depth demonstrations on how to use all the equipment in a safe and efficient manner. Then we signed an equipment release form to confirm we had been taught how to use the equipment and that we understood we had full responsibility for the kit.
Equipment List:
Canon Legria HF G30 Camera

This camera was small and easily portable, therefore very easy for us to shoot with, particularly in the outdoor shoot. Additionally, the camera has an instant face detection feature which helped ensure our shots were in focus and of a good quality. Finally, the touchscreen feature proved very useful as it allowed us to easily watch back our rushes and decide if we had enough good takes on the day.
Canon DM-100 Directional Microphone

The microphone allowed us to easily pick up dialogue even through heavy background noise, This proved very useful in our outdoor shoot as this shoot was dialogue heavy, however there was also heavy rain and the microphone allowed us to still hear our actor through it, thus ensuring a high quality shoot,
Libec TH-650 HD Tripod

This tripod was very useful in the outdoor shoot, as with its retractable legs and spirit levels we were able to ensure the shot was straight despite it being on uneven forest floor. Additionally, the tripod was very lightweight and therefore very portable which was ideal for our shoot.
 |
| The equipment found in our production kit |
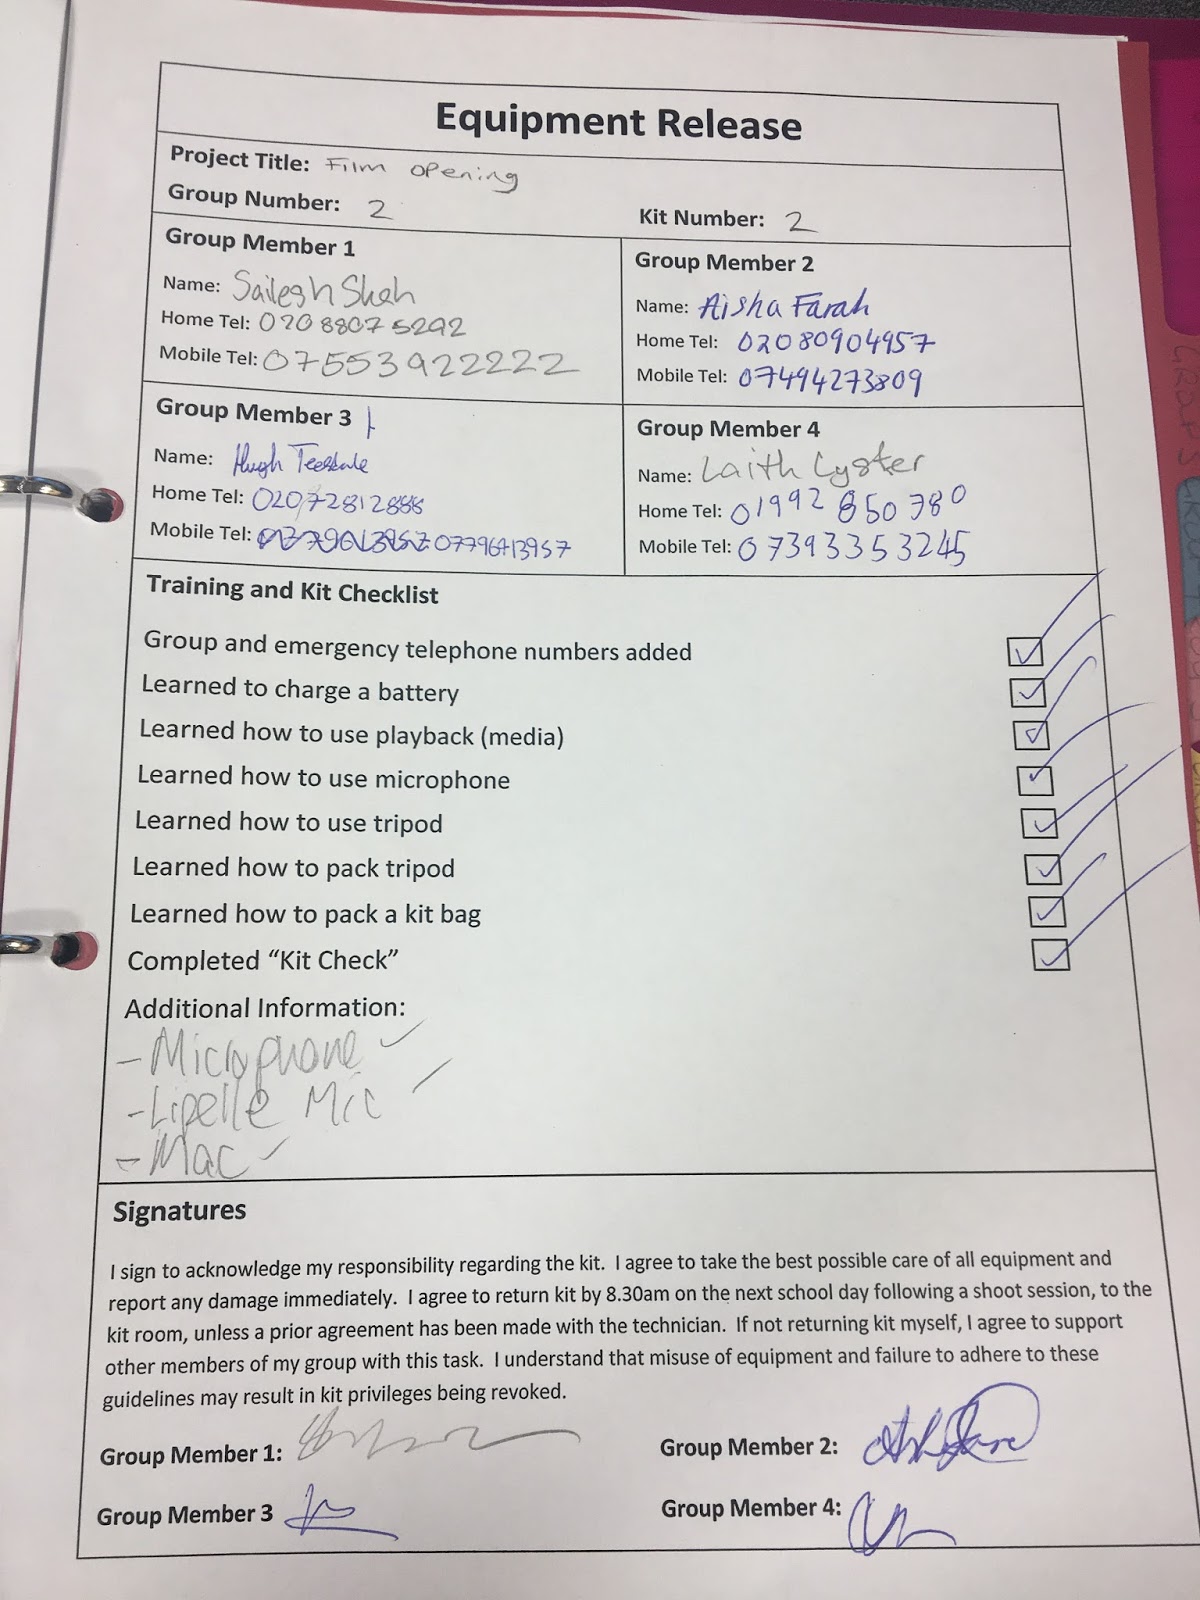 |
| The equipment release form |
Equipment List:
Canon Legria HF G30 Camera
This camera was small and easily portable, therefore very easy for us to shoot with, particularly in the outdoor shoot. Additionally, the camera has an instant face detection feature which helped ensure our shots were in focus and of a good quality. Finally, the touchscreen feature proved very useful as it allowed us to easily watch back our rushes and decide if we had enough good takes on the day.
Canon DM-100 Directional Microphone
The microphone allowed us to easily pick up dialogue even through heavy background noise, This proved very useful in our outdoor shoot as this shoot was dialogue heavy, however there was also heavy rain and the microphone allowed us to still hear our actor through it, thus ensuring a high quality shoot,
Libec TH-650 HD Tripod
This tripod was very useful in the outdoor shoot, as with its retractable legs and spirit levels we were able to ensure the shot was straight despite it being on uneven forest floor. Additionally, the tripod was very lightweight and therefore very portable which was ideal for our shoot.
Subscribe to:
Comments (Atom)