Friday 3 February 2017
R+P Post 20: Reflections so far/looking ahead
My group and I have recorded a podcast in which we talk about our final media product and what we think of the final outcome. I have uploaded it to SoundCloud and you can access it below:
Thursday 2 February 2017
R+P Post 19: Our rough cut
The rough cut was how we referred to the edit of the test shoot.
This edit lasted 3 days with each member of the group putting in equal time. The editing schedule can be seen below:

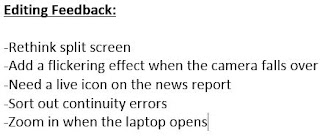
Having finished editing, we, along with our teachers, technician and friends sat down and discussed what went well and what we need to improve from both shooting and editing standpoints for the final film opening. The document below summarises the main areas of improvement from an editing standpoint:
This edit lasted 3 days with each member of the group putting in equal time. The editing schedule can be seen below:

Having finished editing, we, along with our teachers, technician and friends sat down and discussed what went well and what we need to improve from both shooting and editing standpoints for the final film opening. The document below summarises the main areas of improvement from an editing standpoint:

R+P Post 18: Our test shoot
Our test shoot was a shoot designed to uncover any flaws that we may have missed in previous stages and allow us time to make necessary changes in order to make out final film opening as good as it could possibly be. Therefore, we treated this as a main shoot as we felt it would be closest to the actual thing and therefore allow us to effectively analyse and amend our ideas. Therefore, we still created an official shootboard for the test shoot to effectively simulate the real thing.
There was little to no deviation from our original plan and from the shot order set out on the shoot board which was credit to good preparation and decision making within the group, as well as excellent engagement from our actors. However, we underestimated how much time to allocate to some shots, particularly the outdoor shots and as a result we were unable to completely stick to the shootboard guidelines. This proved not be an issue in the long run however as we caught up time elsewhere and ended finishing on time.
The test shoot served it's purpose very well as it gave us a clear idea of what was well though out and works well whilst also highlighted areas of concern where amendments were necessary.
Example of a good shot:
I particularly like this shot as it achieved all the goals we set for this shot. The dim lighting works really well with the the character having his hood down to create an atmosphere of suspense and mystery. Furthermore, the dialogue enhances said atmosphere thus keeping the audience engaged and asking questions.
Example of a bad shot:
This scene overall didn't turn out too bad, but it fell a bit short of what we were trying to achieve. The threat isn't obvious for two reasons, it isn't made obvious in the script and we have since revised the script to resolve this issue. The second reason is that the scene happens too fast and the audience don't have enough time to register what's going on, therefore, in the main shoot we will have to take this scene much slower. Additionally, our idea was to have two unknown feet walk past the camera after it fell to create a sense of mystery and danger, however the intended effect was not there due to poor framing as you couldn't see the feet. Therefore, we will have to be more diligent about our framing in the main shoot.
Finally, having shot everything and edited it, we, along with our teachers, technician and friends sat down and discussed what went well and what we need to improve from both shooting and editing standpoints for the final film opening. The document below summarises the main areas of improvement from a shooting standpoint:

 |
| Our shootboard |
There was little to no deviation from our original plan and from the shot order set out on the shoot board which was credit to good preparation and decision making within the group, as well as excellent engagement from our actors. However, we underestimated how much time to allocate to some shots, particularly the outdoor shots and as a result we were unable to completely stick to the shootboard guidelines. This proved not be an issue in the long run however as we caught up time elsewhere and ended finishing on time.
The test shoot served it's purpose very well as it gave us a clear idea of what was well though out and works well whilst also highlighted areas of concern where amendments were necessary.
Example of a good shot:
I particularly like this shot as it achieved all the goals we set for this shot. The dim lighting works really well with the the character having his hood down to create an atmosphere of suspense and mystery. Furthermore, the dialogue enhances said atmosphere thus keeping the audience engaged and asking questions.
Example of a bad shot:
This scene overall didn't turn out too bad, but it fell a bit short of what we were trying to achieve. The threat isn't obvious for two reasons, it isn't made obvious in the script and we have since revised the script to resolve this issue. The second reason is that the scene happens too fast and the audience don't have enough time to register what's going on, therefore, in the main shoot we will have to take this scene much slower. Additionally, our idea was to have two unknown feet walk past the camera after it fell to create a sense of mystery and danger, however the intended effect was not there due to poor framing as you couldn't see the feet. Therefore, we will have to be more diligent about our framing in the main shoot.
Finally, having shot everything and edited it, we, along with our teachers, technician and friends sat down and discussed what went well and what we need to improve from both shooting and editing standpoints for the final film opening. The document below summarises the main areas of improvement from a shooting standpoint:

R+P Post 17: Our editing arrangements
For the test edit, we as a group agreed to devote all our free periods across a span of 3 days to editing as we felt this would provide adequate time to complete the edit whilst also ensuring we all spent a roughly equal amount of time editing. As we were editing on our own, we were careful to make sure that we made all key decisions beforehand in group meetings or in our group chat as a group to ensure that whoever was editing was doing so with the knowledge that it was what the whole group agreed on. The edit schedule can be seen below:

These arrangements worked very well as not only did it allow us enough time to complete the edit but we were also able to go through it with our peers, teachers and technician to gain valuable feedback on where to improve for the main edit. Therefore, we will most likely use the same system for the main edit, but across a larger time frame as I expect the main edit to require more work.

These arrangements worked very well as not only did it allow us enough time to complete the edit but we were also able to go through it with our peers, teachers and technician to gain valuable feedback on where to improve for the main edit. Therefore, we will most likely use the same system for the main edit, but across a larger time frame as I expect the main edit to require more work.
R+P Post 16: Casting, costumes, hair and make-up
Before shooting we had already planned what our actors would wear in order to portray them in such a way that it would get the desired reaction from the audience.
It is important to note that make up was not necessary for any actors involved as that would have disrupted with the image we were attempting to portray; that is a very gritty, real story.
The test shoot helped us amend our key decisions concerning costume. For example, our antagonist wore his hood indoors which did not make sense to the audience as there was no threat indoors for him to be hiding from. Therefore, we amended his costume to where he wouldn't wear his hood indoors. Additionally, our news anchor was wearing a bright floral shirt in our test shoot which looked very unprofessional and therefore unrealistic for a news anchor and so we changed it to a more simple plain, smart shirt.
 |
| The news anchor's costume before |
 |
| The news anchor's costume after |
R+P Post 15: Our filming location, set design and props
Our sets all had different roles to fulfil and so we dressed each set in such a way that in conjunction with the props each role would be effectively fulfilled.
We had 3 sets - Laith's house, a forest and a classroom:
Laith's House:
This was the antagonist's home and therefore we wanted to create a sinister atmosphere whilst making sure it was still easily recognisable to the audience as a house.
Set Design: We cleaned up the space we were shooting in which involved moving around tables and things off the stairs in order to make Laith the clear focus in the shots as well as making the shoot seem more professional. Additionally, we kept Laith's curtains closed when shooting as we found that when we didn't do that the lighting would often affect the quality of our shots and disrupt the sinister atmosphere. Finally, we made sure to have a rug on the floor and a CD rack in the background as both are easily identifiable features of a house.
Props: There were only a few props in this set but all had a big part to play. We put cushions on the sofa to connote a more homely feel and allow the audience to engage and relate better. We also used a phone and laptop as props in order to better illustrate the story and also make the sequence in this setting more relatable to the audience.

The Forest:
This was the set in which we recorded the bits of the news report which were shot outdoors. We needed an isolated area that was away from any sounds that could potentially interfere and ruin the immersion for the audience e.g. cars/kids screaming.
Set Design: There was no set design in place for the forest as we wanted as natural a look as possible to make it seem as realistic as possible to the audience.
Props: We had a microphone which the news reporter used as this is conventional of real life news reports and therefore would be what the audience expect. This microphone also later contributed to the sinister atmosphere as it ended up being the only thing left of the news reporter following her disappearance.


The Classroom:
This was the set we used for the newsroom in which the news anchor presented from, therefore quite a bit of set design was needed to create this image.
Set Design: To make the setting look more professional - as is what you would expect - we moved a lot of the tables and chairs out of the way and also faced the camera towards a window to the next room. In the end we had one chair and one table, whilst through the window you could see what became our 'newsroom' in which we had people working to add a sense of realism.
Props: We had a set of notes and a laptop on the table as having watched real news reports this was conventional of the news anchor's table. Therefore, it would be easier for the audience to engage and immerse themselves in our film opening. We also had our news anchor wearing a lapel microphone and an earpiece wire in order to make his interaction with the news reporter in the field more obvious and more believable.

R+P Post 14: Our filming arrangements
When shooting we wanted to avoid any unnecessary complications and stress that could be counter productive so as to make the shoot as efficient as possible.
To achieve this goal, as a group we agreed and signed off documents concerning locations, timings, props and the equipment release from the media department. This meant we had all discussed and agreed a set of rules and guidelines by which we would abide on the shoot day and avoid complications.
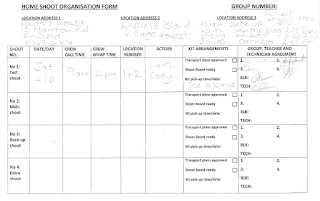
We had two shoots, a home shoot and a school shoot and we made separate arrangements for each.
In the home shoot, we agreed that I would bring the camera kit, Aisha would bring the tripod and Laith would bring the laptop and that we would all meet at Laith's house for 9am. We also agreed that the shooting locations would be within Laith's house and in the nearby Enfield Island Village Forest. We also agreed timings with one actor for when she should arrive through messaging her. We informed her well in advance and agreed all the timings, we also reminded her the day prior to the shoot. This shoot lasted from 9am to 4pm and proved more than enough time.
In the school shoot, it was agreed that Laith would set up the shoot as he had no lesson prior to our 12:30 shoot time, and we also agreed with another actor to arrive at 12:30. Once again this was done through messaging well in advance and then reminding him the day prior to the shoot. This shoot lasted from 12:30 to 1:30 and proved more than enough time.
R+P Post 13: Our Animatic
The third stage of pre-production, following the timeline and storyboard was to create an animatic. This involved us going around school and finding similar settings and props to what we would use in the final shoot and then taking still photos of each scene pictured on our storyboard, using ourselves as stand in actors.
As a group we then edited the shots to the length we had them on the timeline and then put the soundtrack behind the entire thing as well as putting in any sound effects behind any specific shots.
The animatic is a popular form of storyboard in the professional film industry as it brings the storyboard to life and allows you to get a better idea of what your film opening will look like and if it will turn out how you intend it to. For these reasons, we chose to spend some extra time creating one.
The animatic highlighted several issues with our preliminary idea which we then resolved afterwards. It highlighted the amateur and unconvincing nature of our news anchor setup which we resolved by changing the setting and dressing the set better i.e. with a laptop and news notes. It also brought light to the issue of our news dialogue as it was clearly not authentic and therefore would not be believable to the audience. This prompted us to do some extra research into similar news broadcasts and revise the script in a similar style to the news reports that we watched. Finally, the animatic also showed us the difficulty of shooting in low key lighting as it obscured several shot details, having talked to the media technician we decided it would be better to shoot in normal lighting and then dim the shots when editing.
As a group we then edited the shots to the length we had them on the timeline and then put the soundtrack behind the entire thing as well as putting in any sound effects behind any specific shots.
 |
| Animatic editing schedule |
The animatic is a popular form of storyboard in the professional film industry as it brings the storyboard to life and allows you to get a better idea of what your film opening will look like and if it will turn out how you intend it to. For these reasons, we chose to spend some extra time creating one.
The animatic highlighted several issues with our preliminary idea which we then resolved afterwards. It highlighted the amateur and unconvincing nature of our news anchor setup which we resolved by changing the setting and dressing the set better i.e. with a laptop and news notes. It also brought light to the issue of our news dialogue as it was clearly not authentic and therefore would not be believable to the audience. This prompted us to do some extra research into similar news broadcasts and revise the script in a similar style to the news reports that we watched. Finally, the animatic also showed us the difficulty of shooting in low key lighting as it obscured several shot details, having talked to the media technician we decided it would be better to shoot in normal lighting and then dim the shots when editing.
R+P Post 12: Our Storyboard
Following the completion of our timeline, the second stage of pre-production was to create a storyboard. A stage that had already been made much easier by the creation of the timeline. Once again our technician provided us with A3 sugar paper and a variety of different coloured post it notes with which we went on to create a visual representation of the film opening.
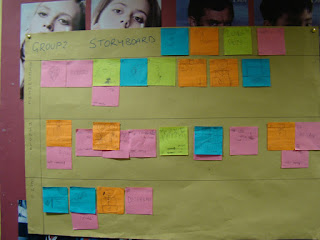
We used 4 different colour post it notes:
We used this colour scheme as it allowed us to easily see what decisions we had made regarding framing of shots. This meant we could easily see if we had enough shot variety to keep the audience engaged and if the shot progression would make sense to the audience. We also used thick arrows to signify camera movement and thin arrows to signify character movement. The graphics post it notes were used for titles and credits so that we could easily see where they would be placed on the screen as well as when.
We created this visual representation as not only did it help us ensure we had enough shot variety and progression but it also provided an easily understandable and accessible document from which we could easily create other documents such as shootboards. Additionally, the benefits of having it as A3 was so that everyone could easily see it and also there was enough space for everyone to work on it simultaneously. Finally, the reason we used post it notes was that they could be easily moved, removed or revised if we changed our mind about any of the shots.
The storyboard provided a solid foundation for our shootboard which in turn made our shoot days much more efficient, and it also provided a guide from which we could edit as it shows key aspects such as shot order.

We used 4 different colour post it notes:
 |
| Yellow = Long Shots |
 |
| Orange = Mid Shots |
 |
| Blue = Close Ups |
 |
| Pink = Graphics |
We used this colour scheme as it allowed us to easily see what decisions we had made regarding framing of shots. This meant we could easily see if we had enough shot variety to keep the audience engaged and if the shot progression would make sense to the audience. We also used thick arrows to signify camera movement and thin arrows to signify character movement. The graphics post it notes were used for titles and credits so that we could easily see where they would be placed on the screen as well as when.
We created this visual representation as not only did it help us ensure we had enough shot variety and progression but it also provided an easily understandable and accessible document from which we could easily create other documents such as shootboards. Additionally, the benefits of having it as A3 was so that everyone could easily see it and also there was enough space for everyone to work on it simultaneously. Finally, the reason we used post it notes was that they could be easily moved, removed or revised if we changed our mind about any of the shots.
The storyboard provided a solid foundation for our shootboard which in turn made our shoot days much more efficient, and it also provided a guide from which we could edit as it shows key aspects such as shot order.
R+P Post 11: Our Timeline
Once we had completed the research and planning aspect of our film opening the first step of pre-production was to create a timeline.

Our media technician provided us with a template to use and from there we included all our shots, the duration of said shots, the credits as well as including our soundtrack, sound effects and dialogue where necessary. We did this over 3 lines on the timeline, one was a video track, another a voice track and the final one was a sound track. This allowed enough space to clearly write down every aspect of each shot and effectively pinpoint the timing of each element. Additionally, the timeline was split into beginning, middle and end which allowed us to clearly distinguish a narrative structure to our film opening.
The timeline was very helpful as it ensured we stuck to the 2 minutes allowed by the brief, and in doing so allowed us to include all the necessary shots that were key to the storyline and narrative flow. Furthermore, the timeline proved helpful in the timing of our news report as it allowed us to allocate enough time for the dialogue. The next step was the storyboard and the timeline made the storyboarding process much easier as through the timeline we had already concluded what shots we were going to include.
When creating our timeline, we used The Shining and Quarantine to help us with the timings, particularly when it concerned the soundtrack, credits and titles.
An example of a title from Quarantine which inspired our titles.
Subscribe to:
Posts (Atom)